
Self-service kiosk settings
The Kiosk section in Settings in the Eatery Club panel: screensaver, QR on the main screen, banners, theme, printer, scanner, terminal and NFC.
Updated: 13.10.2026The Kiosk section in Settings (“Налаштування”, “Кіоск”) holds the settings for the kiosk screen and for the hardware integrations. Every setting is a separate row with a title and a value, and each one is edited and saved on its own.
A setting card has two fields: Name (“Найменування”), the title, which cannot be edited, and Value (“Значення”). To register a device and enter its Android ID, hardware addresses and restaurant, see Kiosks: registering devices.
Opening the section
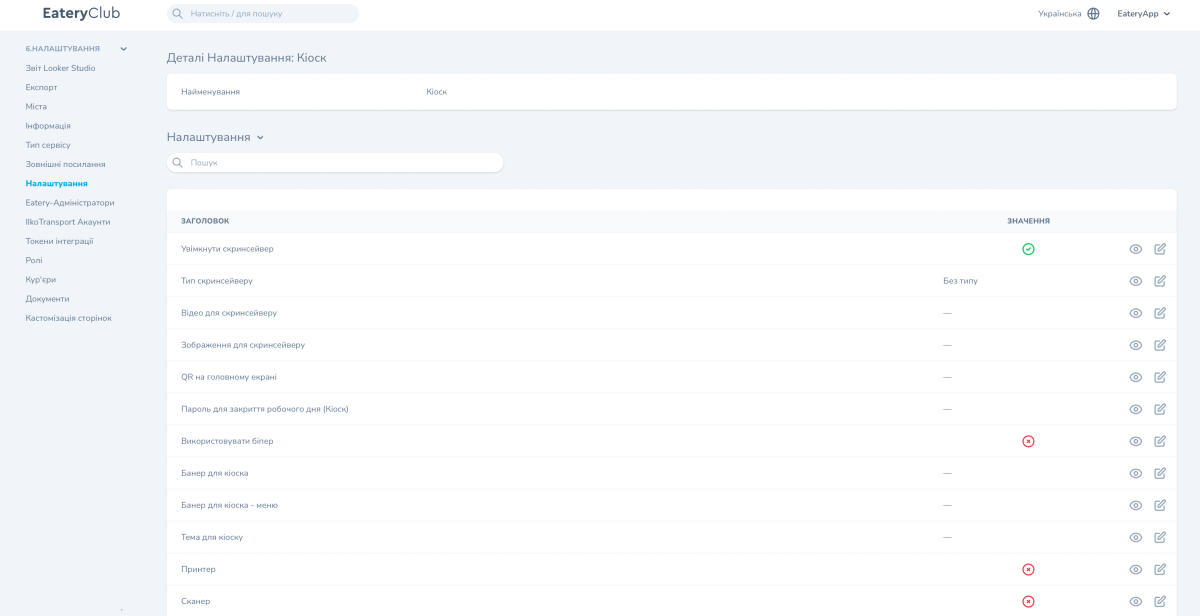
Open Resources, the 6.Settings group, then Settings (“Ресурси”, “6.Налаштування”, “Налаштування”) and choose Kiosk (“Кіоск”) in the list. A card opens with the Settings table: the Title (“Заголовок”) column, the Value (“Значення”) column, and view and edit (the pencil) actions in every row.
Screen settings
Enable screensaver (“Увімкнути скрінсейвер”)
- Value: Switch
- What it means: The screensaver on the kiosk screen
Screensaver type (“Тип скрінсейверу”)
- Value: Choice: “Зображення” (image), “Відео” (video), “Анімація” (animation), “Без типу” (no type)
- What it means: What to show as the screensaver
Screensaver video (“Відео для скрінсейверу”)
- Value: File
- What it means: The form accepts MP4, WebM or MOV up to 50 MB
Screensaver image (“Зображення для скрінсейверу”)
- Value: File
- What it means: The form states a recommendation: up to 5 MB, maximum possible resolution 1000×620 px
QR on the main screen (“QR на головному екрані”)
- Value: A choice of four options
- What it means: Nothing, a QR for the app, a QR for the menu, or both
Kiosk banner (“Банер для кіоска”)
- Value: A list of banners
- What it means: Every entry in the list has a language and an image file, so a banner can be set separately for each language
Kiosk banner — menu (“Банер для кіоска – меню”)
- Value: Image file
- What it means: The banner in the menu section
Kiosk theme (“Тема для кіоску”)
- Value: Choice from a list
- What it means: The kiosk’s appearance. The list holds the themes available to your project
Password to close the working day (“Пароль для закриття робочого дня (Кіоск)”)
- Value: Text
- What it means: The password used to close the working day on the device
Use the beeper (“Використовувати біпер”)
- Value: Switch
- What it means: The sound signal
Hardware integrations
Printer (“Принтер”)
- Value: Switch
- What it means: The receipt printer integration
Scanner (“Сканер”)
- Value: Switch
- What it means: The scanner integration
Terminal (“Термінал”)
- Value: Switch
- What it means: The payment terminal integration
Terminal bank (“Банк термінала”)
- Value: Example options:
PRIVAT_BANK,VST_BANK,RAIFFEISEN_BANK,PUMB_BANK - What it means: The bank that services your payment terminal
NFC
- Value: Switch
- What it means: Contactless payment
NFC bank (“Банк NFC”)
- Value: Choice of a bank from a list
- What it means: The bank for NFC payment
Before changing either field, ask Eatery Club support which bank to select for your equipment.
The rest of the settings in the section
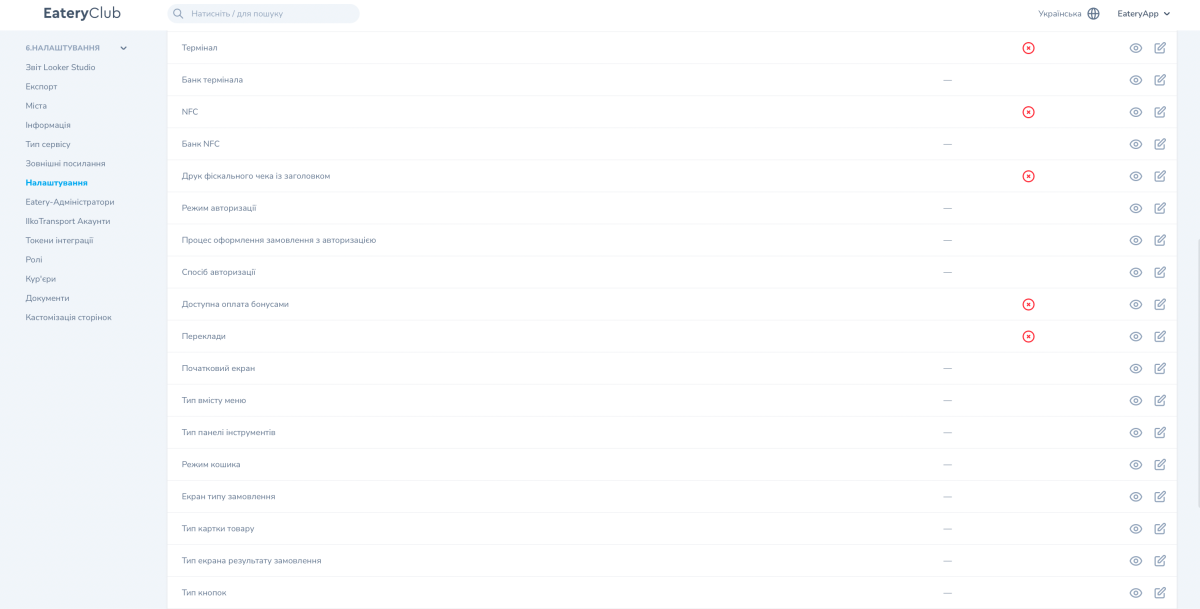
Besides the ones listed above, the section holds settings for receipt printing and the fiscal printer, the guest’s authorization mode and method, the appearance of the screens and the menu, inactivity and payment timeouts, logos and backgrounds. Check with Eatery Club support before changing these settings. What the section contains depends on your project and grows over time.
Scenario: turn on a video screensaver
- Open Settings and choose Kiosk.
- In the Enable screensaver row, click the pencil, turn Value on and save.
- In the Screensaver type row, choose “Відео” (video) and save.
- In the Screensaver video row, upload an MP4, WebM or MOV file up to 50 MB and save.
Every row is saved on its own: changing three settings means three saves.
Scenario: show a QR on the main screen
- Open Settings and choose Kiosk.
- In the QR on the main screen row, click the pencil.
- Choose what to show: nothing, a QR for the app, a QR for the menu, or both.
- Save.
Scenario: turn on the receipt printer
- First register the device and enter the printer address on its card — that is done in the Kiosks: registering devices section.
- Open Settings and choose Kiosk.
- In the Printer row, click the pencil, turn Value on and save.
- Check printing on the device with a test order.
The printer is a separate device and does not start together with the kiosk. We recommend switching the printer on before you start the kiosk; if the printer was switched on after the kiosk, restart the kiosk.
Products meant for the kiosk
The product card carries a separate Exclusive Kiosk switch. It marks a product as meant for the kiosk. The switch itself is described in How to work with products.
Related articles
- Kiosks: registering devices
- How to work with products — the Exclusive Kiosk field is there
- Payment systems
- What an Eatery Club self-service kiosk is and what it gives a venue — on the Kiosk page
