Menu supercategories: the top level of the menu
A supercategory groups categories into one menu entry. Why the first supercategory hides unlinked categories, the fields to fill in, and how to create one.
Updated: 07.10.2026A supercategory groups several ordinary categories into a single top-level entry. For example, the categories “Pizza 20 cm” and “Pizza 30 cm” belong to the supercategory “Pizza”: a guest sees one entry, and the subcategories open inside it.
The first supercategory hides every unlinked category
As soon as at least one supercategory exists, every category that is not linked to a supercategory stops appearing to guests. This is a common reason for an empty menu right after the first setup.
So plan which supercategory each category belongs to first, and only then create the first supercategory.
Where supercategories come from
Supercategories are created on the Eatery Club side, in the panel. They are not passed to the POS system, so they do not exist in the POS.
Supercategory fields
Field and button names are given as they appear in the Ukrainian interface on the screenshots; your panel may show the labels in another language. The form marks “Аліас”, “Значок” and “Активний?” with an asterisk.
- “Аліас”. The internal name.
- “Значок”. An icon from the standard list.
- “Зображення”. Your own icon.
- “Активний?”. The state of the supercategory.
- “Категорії”. The categories that belong to the supercategory.
- “Ресторани”. The restaurant the supercategory belongs to.
How to create the “Pizza” supercategory
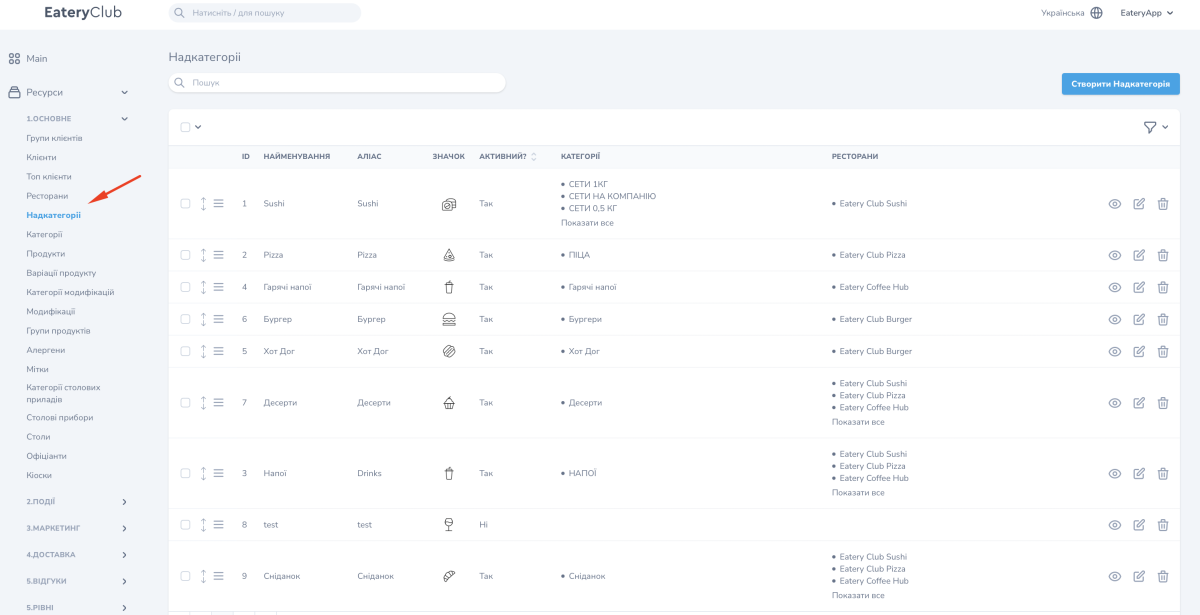
- Open “Ресурси” (resources), the “1.ОСНОВНЕ” (main) group, the “Надкатегорії” (supercategories) item, and click “Створити Надкатегорія” (create supercategory).
- Fill in “Аліас”, for example pizza, and select a standard icon from the list in “Значок”.
- In the “Категорії” field, add “Pizza 20 cm” and “Pizza 30 cm”.
- Select the restaurant and save the supercategory.
- Open the new supercategory in view mode, go to “Переклади”, and fill in the name for every language.
How to check the result
Open the ordering site or the app and pick the restaurant: the menu should show a Pizza item with Pizza 20 cm and Pizza 30 cm inside it. If other categories disappeared after that, link them to their supercategories.
Where to find it in the admin panel
The list of supercategories.