Website Settings: Complete Guide
Learn how to set up your Eatery Club ordering website with GTM, Analytics, Google Ads, Facebook Pixel, JSON-LD, and custom meta tags.
Updated: 27.06.2026Purpose
Configure your Eatery Club ordering website, including branding, analytics, user registration, SEO, custom tags, and real-time functionality.
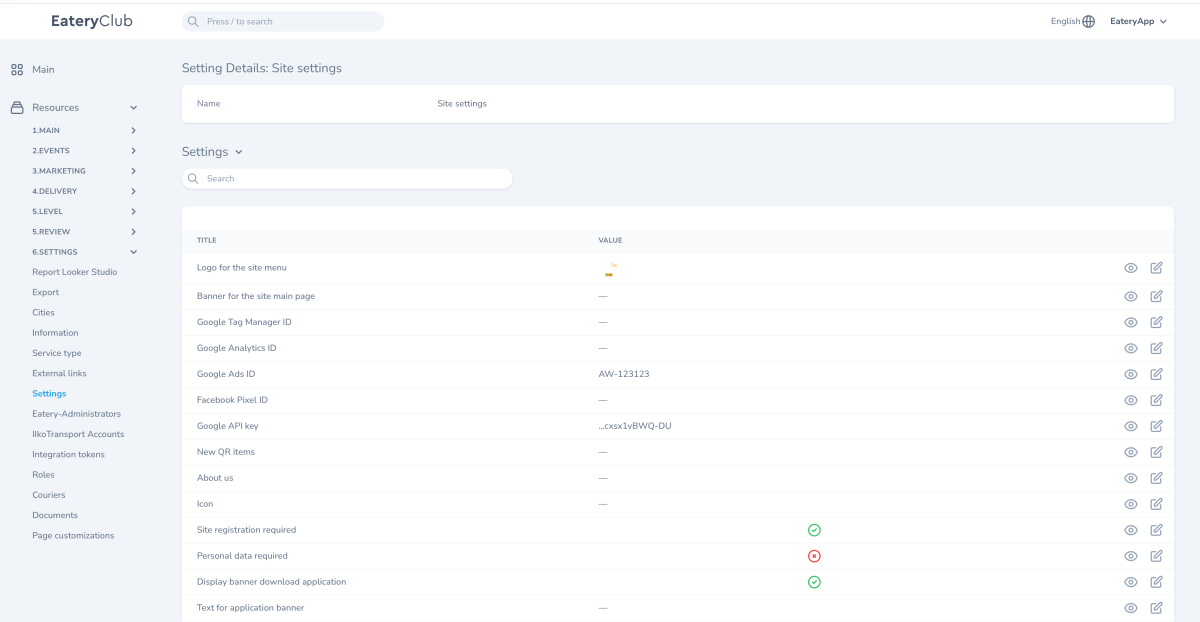
Complete Settings Reference (24 Parameters)
Branding (5)
| Setting | Description |
|---|---|
| Website Menu Logo | Brand logo displayed in the website navigation |
| Hero Banner | Homepage hero banner |
| About Us | Static informational page |
| Favicon | Website icon displayed in browser tabs |
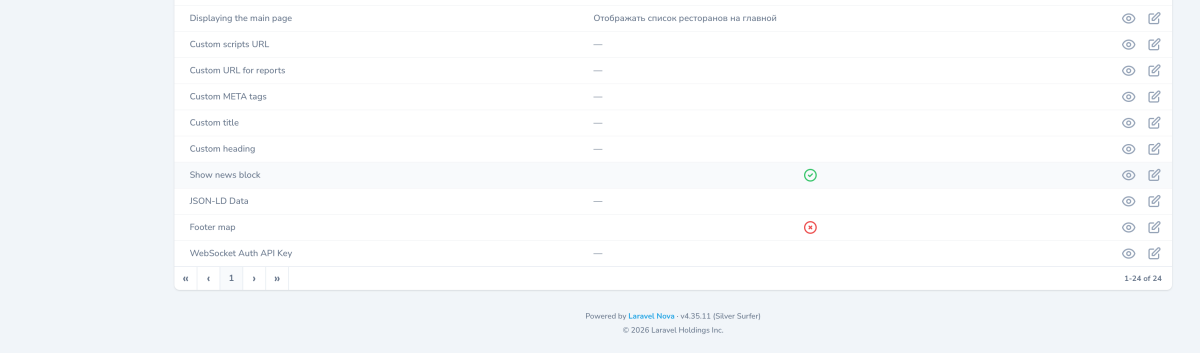
| Footer Map | Toggle to display a mini map with restaurant locations in the website footer |
Analytics & Tracking (5)
| Setting | Description |
| Google Tag Manager ID | GTM-XXXXXXX |
| Google Analytics ID | G-XXXXXXXXXX |
| Google Ads ID | AW-XXX-XXX-XXXX |
| Facebook Pixel ID | Used for Facebook campaign tracking |
| Google API Key | Masked. Typically used for Google Maps integration |
User Experience & Registration (6)
| Setting | Description |
| Require Website Registration | Toggle |
| Require Personal Information | Toggle |
| Show “Download the App” Banner | Toggle |
| App Banner Text | Custom text displayed in the download banner |
| Homepage Layout | Enum (e.g., display the restaurant list on the homepage or other available layouts) |
| Show News Section | Displays the news block on the homepage |
SEO & Customization (6)
| Setting | Description |
| Custom Script URLs | URLs for loading external JavaScript (e.g., chatbots) |
| Custom Reports URL | Custom URL for external reports |
| Custom Meta Tags | SEO metadata |
| Custom Page Titles | SEO page titles |
| Custom Headings | H1/H2 headings for static pages |
| JSON-LD Data | Schema.org structured data used by search engines |
Technical (1)
| Setting | Description |
| WebSocket Authorization Key | Used for real-time functionality (e.g., live order status updates) |
Documents (1, managed in a separate section)
New QR Menu Items
Enable, disable, and reorder QR menu options such as:
- Table Ordering
- Leave Feedback
- Social Media
- News
- Other QR menu items
Why JSON-LD Matters
JSON-LD is a structured data format used by search engines such as Google and Bing to generate rich search results. For restaurant businesses, this enables:
- LocalBusiness listings with star ratings, opening hours, and address displayed directly in search results
- Menu and MenuItem rich results that can showcase dishes in search
- AggregateRating snippets displaying review stars
This provides a competitive SEO advantage over platforms such as Toast, Square, and Clover in the U.S. market, where this level of SEO customization is typically unavailable.
Scenario: Connecting Google Analytics 4
- Create a GA4 property in Google Analytics.
- Copy the Measurement ID (format:
G-XXXXXXXXXX). - Navigate to Settings → Website Settings.
- Paste the ID into the Google Analytics ID field.
- Save your changes.
Result
Analytics events will begin appearing in GA4 within approximately 24–48 hours.
Scenario: Enabling the “Download the App” Banner
- Navigate to Settings → Website Settings.
- Enable Show “Download the App” Banner.
- (Optional) Enter custom text in App Banner Text. If left blank, the default text will be used.
- Save your changes.
Result
A banner linking to the App Store and Google Play will appear at the top of the mobile website. The store links are retrieved from Configuration Settings.
Scenario: Configuring JSON-LD for a Restaurant
- Navigate to Settings → Website Settings → JSON-LD Data.
- Add Schema.org Restaurant structured data, for example:
{
  "@context": "https://schema.org",
  "@type": "Restaurant",
  "name": "Eatery Club Sushi",
  "address": {
    "@type": "PostalAddress",
    "streetAddress": "31 Derybasivska St.",
    "addressLocality": "Odesa",
    "addressCountry": "UA"
  },
  "telephone": "+380993456982",
  "servesCuisine": "Japanese",
  "openingHours": "Mo-Su 09:00-22:00"
}- Save your changes.
- Validate the implementation using Google Rich Results Test.
Changing Google IDs
After changing your Google Analytics or Google Ads ID, historical data will not be transferred to the new property or account.
Only update these IDs when intentionally migrating to a new Google account.
Where to Find It in the Admin Panel
Website Settings
Related Articles
- External Links
- Configuring Push Notifications for Guests Without a Selected City